
| Version 19 (modified by mitty, 14 years ago) (diff) |
|---|
- UT-VPN Web サイト - 筑波大学 VPN オープンソースプロジェクト
- さくらVPSでIPv6を使う - サーバとスイッチで戯れる日記
- UT-VPN v1.10 build 7101 (utvpn-src-unix-v101-7101)
- さくらVPSにUT-VPNを入れる - La Faience
- VPN の素人が UT-VPN を使ってみた K.O.K.Blog
build
- UT-VPN Server/Client on Ubuntu 10.04 の備忘録 - なば日記@不完全なマシマロ
- see also UT-VPN_Startup_Guide_for_UNIX.pdf
- クロスコンパイルについては => wiki:TipAndDoc/Linux/OpenWRT/CrossCompile#utvpn
- openssl 0.9.8のヘッダファイルが同梱されていて、そのままコンパイルするとSEGVしてしまうため、ヘッダファイルを更新する必要がある
- cp /usr/include/openssl/* utvpn-unix-v101-7101-public/src/Mayaqua/openssl/
- Ubuntu 11.04 Natty Narwhal
- mitty@ubuntu-vpn:~$ uname -a
Linux ubuntu-vpn 2.6.38-8-generic #42-Ubuntu SMP Mon Apr 11 03:31:24 UTC 2011 x86_64 x86_64 x86_64 GNU/Linux
- mitty@ubuntu-vpn:~$ uname -a
- mitty@ubuntu-vpn:~$ sudo aptitude install -R build-essential libssl-dev libreadline-dev libncurses-dev
Note: selecting "libncurses5-dev" instead of the virtual package "libncurses-dev" The following NEW packages will be installed: binutils{a} build-essential cpp{a} cpp-4.5{a} dpkg-dev{a} g++{a} g++-4.5{a} gcc{a} gcc-4.5{a} libc-dev-bin{a} libc6-dev{a} libcloog-ppl0{a} libdpkg-perl{a} libelfg0{a} libgmp3c2{a} libgmpxx4ldbl{a} libgomp1{a} libmpc2{a} libmpfr4{a} libncurses5-dev libppl-c2{a} libppl7{a} libreadline-dev libreadline6-dev{a} libssl-dev libstdc++6-4.5-dev{a} linux-libc-dev{a} make{a} patch{a} zlib1g-dev{a} The following packages are RECOMMENDED but will NOT be installed: fakeroot libalgorithm-merge-perl manpages-dev 0 packages upgraded, 30 newly installed, 0 to remove and 0 not upgraded. - mitty@ubuntu-vpn:~$ wget 'http://utvpn.tsukuba.ac.jp/files/utvpn/v1.01-7101-public-2010.06.27/Source%20Code%20(Win32%20and%20Unix)/utvpn-src-unix-v101-7101-public-2010.06.27.tar.gz'
- mitty@ubuntu-vpn:~$ tar xzf utvpn-src-unix-v101-7101-public-2010.06.27.tar.gz
- mitty@ubuntu-vpn:~/utvpn-unix-v101-7101-public$ ./configure --help
(snip)

Please select your Operating System below:
 1: Linux
 2: FreeBSD
 3: Solaris
 4: Mac OS X

Which is your operating system (1-4):
1

Please select your CPU Bits below:
 1: 32-bit
 2: 64-bit

Which is the bits of your CPU (1-2):
2

Makefile is generated. Please execute 'make' to build UT-VPN.
- mitty@ubuntu-vpn:~/utvpn-unix-v101-7101-public$ make
- mitty@ubuntu-vpn:~/utvpn-unix-v101-7101-public$ sudo make install
cp output/utvpnserver/hamcore.utvpn /usr/utvpnserver/hamcore.utvpn
cp output/utvpnserver/utvpnserver /usr/utvpnserver/utvpnserver
echo "#!/bin/sh" > /usr/bin/utvpnserver
echo /usr/utvpnserver/utvpnserver '"$@"' >> /usr/bin/utvpnserver
echo 'exit $?' >> /usr/bin/utvpnserver
chmod 755 /usr/bin/utvpnserver
cp output/utvpnclient/hamcore.utvpn /usr/utvpnclient/hamcore.utvpn
cp output/utvpnclient/utvpnclient /usr/utvpnclient/utvpnclient
echo "#!/bin/sh" > /usr/bin/utvpnclient
echo /usr/utvpnclient/utvpnclient '"$@"' >> /usr/bin/utvpnclient
echo 'exit $?' >> /usr/bin/utvpnclient
chmod 755 /usr/bin/utvpnclient
cp output/utvpncmd/hamcore.utvpn /usr/utvpncmd/hamcore.utvpn
cp output/utvpncmd/utvpncmd /usr/utvpncmd/utvpncmd
echo "#!/bin/sh" > /usr/bin/utvpncmd
echo /usr/utvpncmd/utvpncmd '"$@"' >> /usr/bin/utvpncmd
echo 'exit $?' >> /usr/bin/utvpncmd
chmod 755 /usr/bin/utvpncmd

--------------------------------------------------------------------
Installation completed successfully.

Please execute 'utvpnserver start' to run UT-VPN Server Background Service.
Or please execute 'utvpnclient start' to run UT-VPN Client Background Service.
And please execute 'utvpncmd' to run UT-VPN Command-Line Utility to configure UT-Server or UT-VPN Client.
--------------------------------------------------------------------
init.d
- start-stop-daemonはうまく動かない
- pidfileに記録されるPIDが実際と違う
- /var/run/utvpnserver.pid
1507
- ps aux | grep utv
root      1511  0.0  0.1  26432  1276 ?        S<s  23:43   0:00 /usr/utvpnserver/utvpnserver execsvc
root      1512  0.8  1.4  51808 14300 ?        S<l  23:43   0:00 /usr/utvpnserver/utvpnserver execsvc
- server/clientともに、自身で既に実行中か判断してくれるので、pidfileによる制御は実用上不要
utvpnsmgr
- 先にutvpnserverを起動しておく
- mitty@ubuntu-vpn:~$ sudo utvpnserver start
SoftEther UT-VPN Server Service Started.
- mitty@ubuntu-vpn:~$ sudo utvpnserver start
- 接続先設定
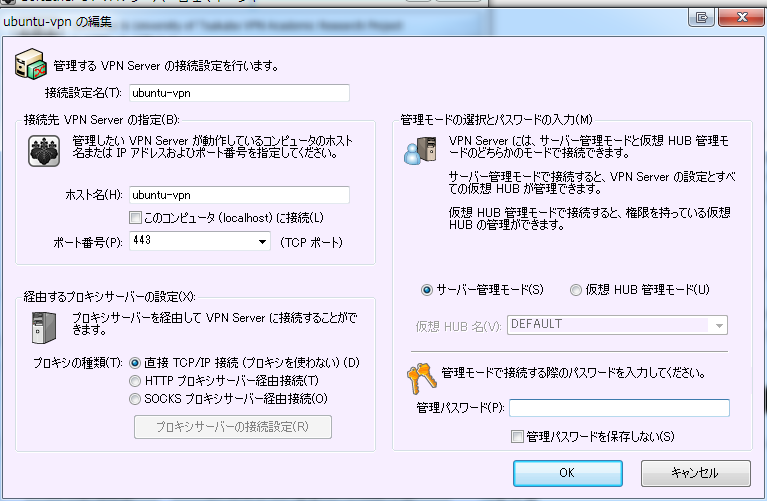
- 初回接続時にパスワードを設定するか質問される
- サーバ管理画面


utvpncmgr
- ポートは9930/tcp固定、「hostname:port」等によるポート指定は不可
- Port forwardもしくはソース書き換えにより、vpncmgr(PacketiX VPN クライアント接続マネージャ)を使ったリモート管理も可能
- 同時接続している例

- 同時接続している例

- マネージャ用ポートの変更(vpncmgrで管理する場合)
-
utvpn-unix-v101-7101-public/src/Cedar/Client.h
old new 81 81 #ifndef CLIENT_H 82 82 #define CLIENT_H 83 83 84 #define CLIENT_CONFIG_PORT 99 30// クライアントポート番号84 #define CLIENT_CONFIG_PORT 9999 // クライアントポート番号 85 85 #define CLIENT_NOTIFY_PORT 9983 // クライアント通知ポート番号 86 86 #define CLIENT_WAIT_CN_READY_TIMEOUT (10 * 1000) // クライアント通知サービスが起動するまでの待機時間 87 87
-
local bridge
- VPN オンラインマニュアル - 3.6 ローカルブリッジ 3.6.11 Linux におけるローカルブリッジの注意事項
Linux オペレーティングシステム内部での制限事項により、VPN 側 (仮想 HUB 側) からローカルブリッジしている LAN カードに割り当てられる IP アドレスに対して通信を行うことはできません。この制限は PacketiX VPN が原因ではなく、Linux の内部構造に原因があります。もし VPN 側 (仮想 HUB 側) から Linux でローカルブリッジに使用しているコンピュータ本体と、何らかの通信を行いたい場合 (たとえば VPN Server / VPN Bridge サービスと HTTP サーバーサービスを両方動作させており、VPN 側からもサーバーサービスにアクセスさせたい場合) は、ローカルブリッジ用の LAN カードを用意して接続し、その LAN カードと既存の LAN カードの両方を物理的に同じセグメントに接続してください (この他の場合においても 「3.6.3 ローカルブリッジ用の LAN カードの準備」 で解説したように、ローカルブリッジに使用する LAN カードはそのための単独のものを用意することが推奨されています)。
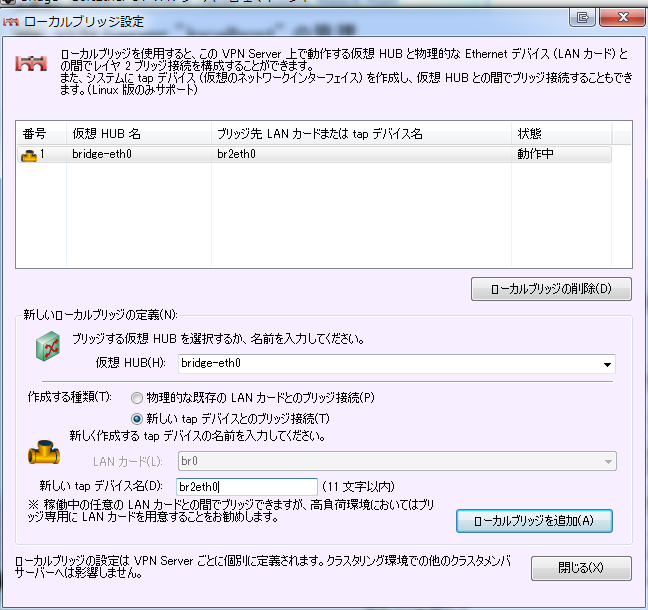
- 物理NICを追加するのが難しい場合(ノートPCなど)、UT-VPN Server側でTAPデバイスとローカルブリッジを作成し、TAPとターゲットとなる物理NICをさらにブリッジする
- 単に物理NIC(例:eth0)のLinuxブリッジ(例:br0)を作成し、それに対してUTVPNからローカルブリッジを作成するだけではだめなので注意
- macvlanで作成した仮想NICではうまく動作しない模様
物理的な Ethernet インターフェイス "utvpn" との間の通信に失敗したため、ローカルブリッジを停止しました。
- ローカルブリッジ設定
- /etc/network/interfaces
auto eth0 iface eth0 inet manual # address 192.168.1.254 # netmask 255.255.255.0 auto br0 iface br0 inet static address 192.168.1.254 netmask 255.255.255.0 bridge_ports eth0 tap_br2eth0 bridge_maxwait 0 auto eth1 iface eth1 inet dhcp- bridge-utilsパッケージ(Ubuntuの場合)が必要
- eth1はWANと仮定
- bridge_maxwaitを設定しないとブリッジデバイス側のIPが確定せずDHCPdが終了してしまう
- 検証
- ローカルブリッジ側
- ifconfig -a
br0 Link encap:Ethernet HWaddr 00:0c:29:eb:65:e0 inet addr:192.168.1.254 Bcast:192.168.1.255 Mask:255.255.255.0 inet6 addr: fe80::20c:29ff:feeb:65e0/64 Scope:Link UP BROADCAST RUNNING MULTICAST MTU:1500 Metric:1 RX packets:420 errors:0 dropped:0 overruns:0 frame:0 TX packets:344 errors:0 dropped:0 overruns:0 carrier:0 collisions:0 txqueuelen:0 RX bytes:27416 (27.4 KB) TX bytes:29280 (29.2 KB) eth0 Link encap:Ethernet HWaddr 00:0c:29:eb:65:e0 inet6 addr: fe80::20c:29ff:feeb:65e0/64 Scope:Link UP BROADCAST RUNNING MULTICAST MTU:1500 Metric:1 RX packets:415 errors:0 dropped:0 overruns:0 frame:0 TX packets:407 errors:0 dropped:0 overruns:0 carrier:0 collisions:0 txqueuelen:1000 RX bytes:34146 (34.1 KB) TX bytes:31926 (31.9 KB) eth1 Link encap:Ethernet HWaddr 00:0c:29:eb:65:d6 inet addr:192.168.49.132 Bcast:192.168.49.255 Mask:255.255.255.0 inet6 addr: fe80::20c:29ff:feeb:65d6/64 Scope:Link UP BROADCAST RUNNING MULTICAST MTU:1500 Metric:1 RX packets:1876 errors:0 dropped:0 overruns:0 frame:0 TX packets:1454 errors:0 dropped:0 overruns:0 carrier:0 collisions:0 txqueuelen:1000 RX bytes:277489 (277.4 KB) TX bytes:235534 (235.5 KB) lo Link encap:Local Loopback inet addr:127.0.0.1 Mask:255.0.0.0 inet6 addr: ::1/128 Scope:Host UP LOOPBACK RUNNING MTU:16436 Metric:1 RX packets:492 errors:0 dropped:0 overruns:0 frame:0 TX packets:492 errors:0 dropped:0 overruns:0 carrier:0 collisions:0 txqueuelen:0 RX bytes:91119 (91.1 KB) TX bytes:91119 (91.1 KB) tap_br2eth0 Link encap:Ethernet HWaddr 00:ac:d8:8d:74:62 inet6 addr: fe80::2ac:d8ff:fe8d:7462/64 Scope:Link UP BROADCAST RUNNING MULTICAST MTU:1500 Metric:1 RX packets:483 errors:0 dropped:0 overruns:0 frame:0 TX packets:398 errors:0 dropped:0 overruns:0 carrier:0 collisions:0 txqueuelen:500 RX bytes:31862 (31.8 KB) TX bytes:28424 (28.4 KB) - brctl show br0
bridge name     bridge id               STP enabled     interfaces
br0             8000.000c29eb65e0       no              eth0
                                                        tap_br2eth0
- ifconfig -a
- VPN Client
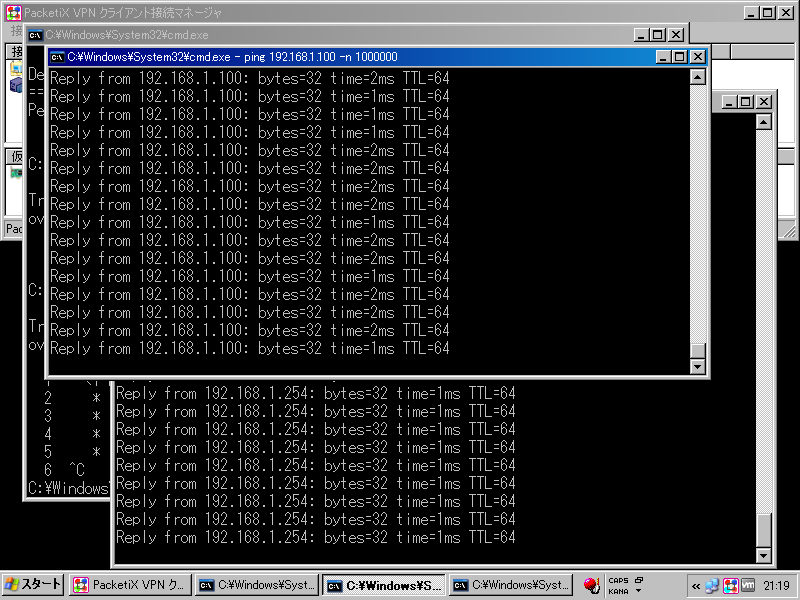
- 192.168.1.100 -> ローカルブリッジを行っているNICの先に接続されているノード
- 192.168.1.100 -> ローカルブリッジを行っているNICの先に接続されているノード
- ローカルブリッジ側


NoAddressPollingIPv4, NoAddressPollingIPv6
- 仮想HUB拡張オプションで設定できる、仮想HUB内のIPアドレスとMACアドレスを監視(ポーリング)するかどうかのbool値
- 172.31.xx.yy / 00:AE:WW:XX:YY:ZZ からARP
- fe80:: (IPv6) からICMPv6
Attachments (5)
- connection.png (47.0 KB) - added by mitty 15 years ago.
- server-management.png (64.9 KB) - added by mitty 15 years ago.
- utvpncmgr-vpncmgr.png (96.3 KB) - added by mitty 15 years ago.
- localbridgesetting.png (45.1 KB) - added by mitty 15 years ago.
- winxpclient.png (31.6 KB) - added by mitty 15 years ago.
Download all attachments as: .zip